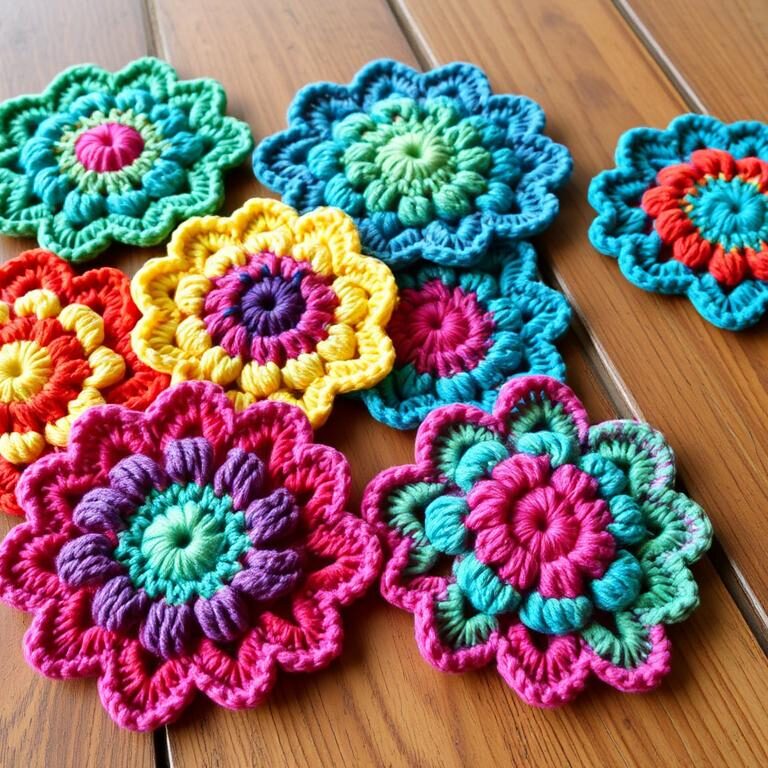
crochet flower coasters

Create Your Own Charming Crochet Flower Coaster

As I sat in my cozy living room, the sunlight streaming through the window, I felt inspired. I remembered the leftover skeins of soft, vibrant cotton yarn in my craft stash. An idea formed – why not make a set of charming crochet flower coasters? These coasters would protect my furniture and add elegance to my décor.

Key Takeaways

  • Discover the joy of creating your own unique crochet flower coasters
  • Learn about the benefits of making handmade coasters for your home
  • Explore a variety of crochet patterns and designs to choose from
  • Uncover tips and tricks for crafting the perfect crochet flower coasters
  • Discover how to add a personal touch to your coasters with color and customization

Introduction to Crochet Flower Coasters

Crochet flower coasters bring a handmade charm to any room. They are made by crocheting yarn into a flower design. This makes them both useful and decorative, protecting your furniture from water marks.

By crocheting your own, you can pick the colors and patterns. This makes them a great addition to your home or a thoughtful gift.

What are Crochet Flower Coasters?

Crochet flower coasters are small, circular mats made from yarn. They have a flower pattern with detailed petals and a central stitch. This design makes them visually appealing and functional.

They prevent water damage and add charm to any room. This makes them a great way to enhance your home’s look.

Benefits of Making Your Own Coasters

  • Personalize your home decor with unique, handmade pieces
  • Create thoughtful gifts for friends and family
  • Engage in a relaxing and rewarding crafting activity
  • Explore your creativity by experimenting with different crochet projects and yarn crafts
  • Add a touch of floral decor to your living space with beautiful crochet flower coasters

Making your own handmade coasters is rewarding and fun. Whether you’re experienced or new to crochet, it’s a great hobby. In the next sections, we’ll cover the materials, techniques, and patterns for your crochet flower coasters.

Materials Needed for Crochet Flower Coaster

To start your yarn crafts and crochet projects, you’ll need some basic materials. For making cute cotton coasters, you’ll need:

Yarn

Choose 100% cotton yarn in your favorite color and weight. Cotton is great for coasters because it absorbs water well. It’s also easy to work with, which is important since making one coaster takes about 2 hours.

Crochet Hook

Pick a crochet hook that matches your yarn’s weight. A 3.5 mm hook works best for these coasters. The coasters will be about 6 inches (15 cm) in diameter when they’re done.

Scissors and Darning Needle

You’ll need sharp scissors to cut your yarn and a darning needle to hide the ends. These details make your coasters look professional.

With these simple supplies, you can make your own beautiful crochet flower coasters. They make great DIY gifts too.

“Crochet is the perfect craft for creating unique, personalized gifts that show you’ve put in the time and effort to make something special.”

Crochet Stitches and Abbreviations

Learning the basic crochet stitches and their abbreviations is key for projects, like crochet patterns for crochet stitches. These stitches are the base for making detailed and lovely crochet coasters. We’ll look at the main stitches and their abbreviations you’ll find in the crochet flower coaster pattern.

  • Single Crochet (sc): A basic stitch that creates a tight, compact fabric.
  • Double Crochet (dc): A taller stitch that provides more drape and flexibility to your crochet work.
  • Half Double Crochet (hdc): A stitch that falls between single and double crochet in height and tension.
  • Slip Stitch (sl st): A minimalist stitch used for joining rounds, seaming, and creating smooth transitions.
  • Chain (ch): The foundational stitch that serves as the starting point for most crochet patterns.

Knowing these basic crochet stitches and their abbreviations will help you with the crochet flower coaster pattern. You’ll make your own unique and lovely crochet projects.

Remember, practice makes perfect. The more you crochet, the more comfortable you’ll become with these essential stitches and abbreviations.

With a solid understanding of the fundamental crochet stitches and their abbreviations, you’ll be able to confidently follow the instructions for the crochet flower coaster pattern. You’ll make beautiful, functional crochet pieces for your home.

Getting Started with the Crochet Flower Coaster Pattern

Ready to start making your own crochet projects? First, learn the magic ring technique. It makes your coaster’s center neat and secure. Then, you’ll add more stitches in each round to shape the flower.

It’s important to keep your tension even and count your stitches right. This will help your coaster look just right.

Creating a Magic Ring

To begin, make a magic ring or adjustable loop. This method lets you start with a tight center, unlike a loose chain. It’s great for crochet patterns and crochet projects that need a clean finish.

Working in Rounds

After learning the magic ring, start working in rounds. You’ll add more stitches in each round to build the flower shape. Keep an eye on your stitch count and tension to get a symmetrical coaster.

With the magic ring and round-by-round method, you’re ready to make beautiful yarn crafts. They’ll add handmade charm to any room. Let’s get started!

“Crochet flower coasters are the perfect way to add a touch of whimsy and color to your home decor.”

Crochet Flower Coaster

Making your own crochet projects, like the lovely handmade coasters, is very rewarding. The pattern for the crochet flower coaster takes you through exciting rounds. Each round adds to the intricate floral decor.

It starts with increasing stitches and then clusters. You’ll also learn double crochet and slip stitches. The pattern guides you every step of the way.

To get your coasters to look great, follow the pattern closely. Keep your tension and stitch count even. The pattern might teach you how to start with a magic ring and work in rounds. It also shows how to use different stitches for the beautiful flowers.

Round Stitch Instructions Stitch Count
1 Sc 6 into magic ring 6
2 Work 2 sc in each st all the way around 12
3 *Sc, 2 sc in same st, *repeat all the way around 18
4 *2 sc in same st, sc 2, *repeat all the way around 24
5 *Sc 3, 2 sc in same st, *repeat all the way around, sl st into the first st of the round 30
6 Ch 1 with color of your choice, hdc in each st all the way around, sl st into first st of round 30
7 Ch 1, sl st into that same st, *sc, hdc, 5 dc in same st, hdc, sc, sl st, *repeat until the end of the round, sl st into first st of round 50
8 Ch 1, sl st into that same st, *sc, hdc 3, 3 hdc in same st, hdc 3, sc, sl st, *repeat until the end of the round, sl st into first st of round 60
9 Ch 1, sl into that same st, *sc 2, hdc, 2 hdc in same st, hdc, 2 hdc in same st, hdc, 2 hdc in same st, hdc, sc 2, sl st, *repeat until the end of the round, sl st into first st of the round 75

By following the pattern and paying attention to detail, you can make beautiful coasters. They will add charm and floral decor to your home. Enjoy making these crochet projects and be proud to show off your creations.

Adding Color to Your Crochet Flower Coaster

Making your own cotton coasters lets you pick your favorite colors. You can go for one color, a single color scheme, or try out different floral decor shades. Think about the look you want, like a simple, classic style or something bold and bright for home decorations. The right yarn colors can really make your diy gifts stand out.

Choosing Yarn Colors

Choosing yarn colors for your crochet flower coasters opens up a lot of options. Here are some tips to pick the best shades:

  • Choose one color for a timeless, elegant look. White, beige, or gray are always good choices.
  • Use different tints and shades of the same color family, like blues or greens, for a monochromatic look.
  • Try mixing complementary colors, like yellow and purple or red and green, for a bold design.
  • Go for vibrant, contrasting colors to make your coasters really pop.
  • Think about the decor of the place where the coasters will go. Pick colors that match the home decorations.

There are so many ways to make cotton coasters with your own colors. Let your creativity flow and have fun finding the perfect colors for your floral decor and diy gifts.

Crochet flower coasters

“The right color palette can transform a simple crochet project into a stunning work of art.”

Crochet Flower Coaster Patterns and Designs

Unleash your creativity and bring a touch of floral flair to your living space with our captivating crochet flower coaster patterns. Whether you prefer a delicate, compact design or a more substantial, eye-catching piece, we’ve got you covered with two distinct options that are sure to impress.

Small Flower Coaster Pattern

Embrace the charm of our small flower coaster pattern, perfect for adding a delicate touch to your home decor. This pattern guides you through the creation of a compact, intricate floral design that will elevate the look of any surface. From the initial magic ring to the final rounds, you’ll discover the joy of crocheting your own beautiful crochet flower coasters.

Large Flower Coaster Pattern

For a more substantial and attention-grabbing crochet project, our large flower coaster pattern is the perfect choice. Unleash your creativity and bring a bold, eye-catching floral element to your handmade coasters. This pattern takes you step-by-step through the process of creating a stunning, floral decor piece that will add a touch of elegance to any room.

Regardless of your skill level, these crochet patterns offer the perfect opportunity to explore the art of crocheting flower coasters and elevate your home with these charming, crochet projects. Let’s get started and bring your vision to life!

“The beauty of crochet flower coasters lies in their ability to transform a simple surface into a work of art.” – Crochet Enthusiast

Finishing Touches for Crochet Flower Coasters

After making your own crochet projects, it’s time to add the final touches to your crochet flower coasters. These details make your diy gifts look better and more professional. They’re perfect for showing off or giving as presents.

Weaving in Ends

First, you need to weave in any loose ends. This makes your crochet flower coasters neat and secure. It also gives them a polished look that stands out.

Blocking Coasters

Blocking is a key step. It involves gently shaping your crochet flower coasters to get a smooth finish. This keeps them the right size and shape.

By doing these steps, your crochet flower coasters will be ready to enjoy. These finishing touches make your handmade coasters even more special.

crochet flower coasters

Coaster Size Diameter Skill Level Round 1 Stitches Round 2 Stitches Round 3 Stitches Round 4 Stitches Round 5 Stitches
Small Coaster 4.5 inches (12cm) Easy 12 dc 24 dc 36 dc 36 dc, 12 ch1 sp 60 sc
Large Coaster 6.5 inches (17cm) Easy 12 dc 24 dc 36 dc 42 dc 54 dc, 18 ch1 sp

The crochet flower coasters come in small and large sizes. Both are easy to make, great for beginners and experts. The number of stitches changes slightly between sizes, but the process is the same.

Free patterns and Pinterest show how popular crochet projects like handmade coasters are. There are many designs, including flowers, to match different tastes.

Styling and Using Crochet Flower Coasters

Crochet flower coasters are great for adding charm to your home. They’re perfect for any occasion, whether you’re hosting a party or just want to make your table look better. These coasters can be styled in many ways to make your home look more inviting.

Decorative Coaster Ideas

Try using your crochet flower coasters in a floral-themed centerpiece. Place them in a bowl or tray, or under plants or vases. This creates a beautiful display that looks great with your home decor.

If you have coasters in different colors and sizes, group them together for a stunning look. You can arrange them in a pattern or scatter them around your room. This adds color and texture to your space.

“The versatility of these handmade coasters allows you to get creative with how you style and use them in your living space.”

Don’t just use your coasters for protecting your table. Use them as a base for other decor items like candles or small plants. This shows off your crochet skills and makes your space look better.

Styling your crochet flower coasters in creative ways adds a personal touch to your home. Let your imagination run wild with these versatile pieces. They can make your home decor stand out.

Crochet Flower Coaster Tips and Tricks

Starting your journey to make crochet flower coasters? Here are some tips to help. Keeping your tension even is crucial for perfect coasters. Stitch markers are also a big help, marking rounds for a smooth pattern.

After finishing, blocking your coasters is a must. It shapes them to lay flat and highlights the flower designs. Feel free to add your own twist with colors or embellishments like buttons or beads. This makes your crochet projects truly special.

  1. Maintain consistent tension for even coasters
  2. Use stitch markers to keep track of rounds
  3. Block coasters to achieve desired shape and size
  4. Personalize with unique color schemes and embellishments

Remember these handmade coasters tips to make stunning, useful yarn crafts. Enjoy your crochet journey!

Conclusion

Making your own crochet flower coasters is rewarding and useful. It brings handmade charm to your home. You can pick colors and designs that match your style. This makes unique gifts for your loved ones.

The crochet flower coasters also protect your furniture. They add beauty to your space. This makes your living area look better.

With Peaches ‘N Cream Yarn and a 5 mm crochet hook, you can make special coasters. They have a two-toned design with 6 petals and are about 5 inches wide. The pattern is easy, perfect for beginners.

Try different color combinations to make your coasters special. This way, you can match them with your home’s look. You can give these handmade coasters as DIY gifts to your friends and family. You can also make them in one color or many for a cool look.

FAQ

What are crochet flower coasters?

Crochet flower coasters are a lovely home accessory. They are made by crocheting yarn into flower shapes. These shapes protect furniture from water marks and stains.

What are the benefits of making your own crochet flower coasters?

Making your own coasters lets you pick colors and patterns. It’s a great way to make unique gifts. Plus, it’s a calming and rewarding craft.

What materials are needed to make crochet flower coasters?

You’ll need 100% cotton yarn, a crochet hook, scissors, and a darning needle. These are the basics for starting your project.

What crochet stitches and abbreviations are used in the patterns?

You’ll use stitches like single crochet (sc), double crochet (dc), and half double crochet (hdc). Also, slip stitch (sl st) and chain (ch) are common.

How do you start the crochet flower coaster pattern?

Begin with a magic ring or adjustable loop. This makes a neat center for your coaster.

Can you customize the colors of the crochet flower coasters?

Yes, you can pick your favorite colors. You can use one color, different shades, or contrasting colors.

What are the different crochet flower coaster patterns and designs?

This guide covers two patterns: a small coaster and a large one. Each has its own floral design.

What are the finishing touches for the crochet flower coasters?

Finish by weaving in loose ends and blocking the coasters. Blocking makes them smooth and keeps their shape.

How can you style and use the crochet flower coasters?

You can display them alone or together. They’re great for adding handmade beauty to your space.

What are some tips and tricks for making crochet flower coasters?

Tips include keeping tension even, using stitch markers, and blocking. You can also add embellishments or mix colors for a personal touch.

Source Links

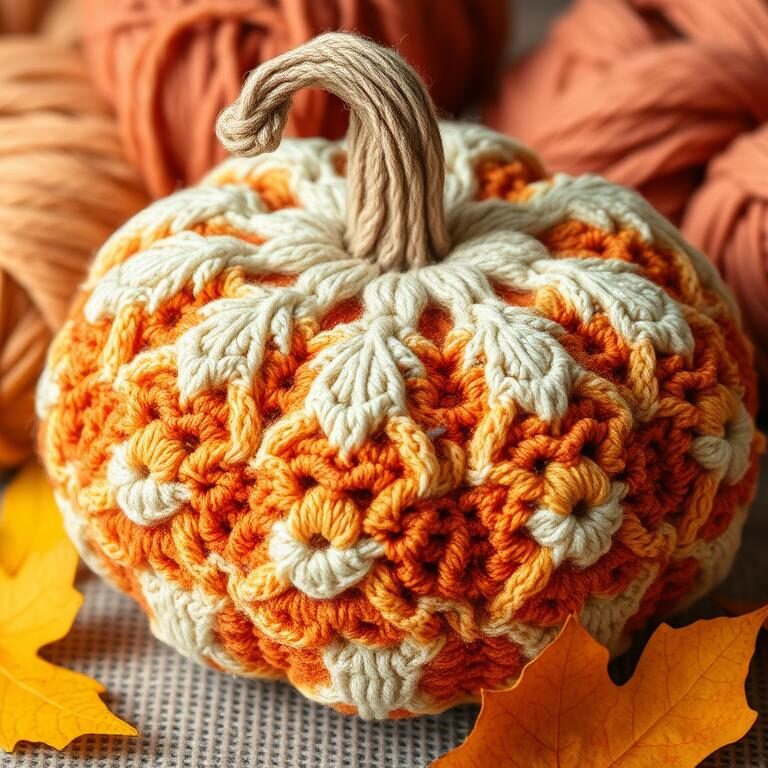
crochet pumpkin

Cozy Up with Crochet Pumpkin Free Pattern!

As the cool autumn breeze whispers through the changing leaves, I feel the urge to cozy up. This year, I’ve found a delightful way to enjoy the season – by crocheting my own Pumpkin Spice Cozy!

This quick and easy crochet project adds autumn charm to any mug. It turns your favorite hot beverage into a cozy experience. Whether it’s a pumpkin spice latte, apple cider, or your morning brew, this cozy will warm your hands and brighten your day.

 These seasonal DIY projects not only add a touch of autumnal beauty to your home decor, but they also offer a fun and engaging way to hone your crochet skills. In this post, I’m excited to share a free crochet tutorial for making your very own cozy pumpkins, designed to bring warmth and whimsy to your fall festivities. So grab your yarn and hook, and let’s dive into the world of crochet!

Key Takeaways

  • Crochet a cozy pumpkin decoration for your favorite mug in under 30 minutes
  • Use worsted weight yarn and simple crochet stitches to create a customizable pumpkin size
  • Elevate your autumn and Thanksgiving decor with this easy crochet pumpkin pattern
  • Enjoy a warm, cozy beverage with your handmade crochet pumpkin cozy
  • Follow the step-by-step instructions and video tutorial to make your own crochet pumpkin

Introduction: Embrace the Pumpkin Spice Season

Pumpkin Spice Season is my favorite time of year! I found the pumpkin spice coffee creamer at my local store. It inspired me to make a cozy crochet project.

I wanted to create a simple pumpkin design. It would add warmth and coziness to my coffee mornings.

Pattern Design and Construction

This coffee cozy is made in flat rows with single crochet stitches. It forms a rectangular base. The pumpkin applique is crocheted separately and then stitched onto the cozy.

Crochet Pumpkin Spice Cozy on a Reusable Starbucks Mug

This cozy fits a standard reusable Starbucks mug. It adds a cozy, seasonal touch to your coffee. You can adjust the size to fit your mug perfectly.

Enjoying a pumpkin spice latte or a classic coffee is better with this cozy. It’s sure to make your pumpkin spice season more special. Get ready to cozy up and enjoy the flavors of fall!

Crochet Pumpkin Free Pattern: Materials Needed

To make this cozy crochet pumpkin, you’ll need some basic supplies. First, grab your worsted weight yarn. I’m using I Love This Yarn in Ivory, Burnt Pumpkin, and Light Sage, plus Red Heart Super Saver in Café Latte. These yarns are affordable and come in many colors and styles.

Yarn Choices and Substitutions

This crochet pumpkin pattern is great because you can change the yarn easily. You can swap the yarns I chose for others like Vanna’s Choice, Caron, or Lion Brand. Just pick shades of orange, brown, and green.

Additional Crochet Supplies

You’ll also need some extra crochet supplies to finish the project. A size G (6) crochet hook is perfect, along with a tapestry needle, scissors, and stitch markers. These tools will make it easy to create your crochet pumpkin pattern.

With these crochet pumpkin materials, you’re ready to make a cozy fall decoration. Now, let’s start with the pattern instructions!

Stitch Guide for the Crochet Pumpkin Pattern

Making the cozy crochet pumpkin applique is fun. It uses basic stitches that beginners can learn. The pattern is written in US crochet terms, making it easy for everyone.

The pumpkin is made in the round, starting with a magic circle. You’ll use stitches like the chain (ch), slip stitch (sl st), single crochet (sc), and double crochet (dc). These stitches help shape the pumpkin. The pattern also uses double crochet stitches in the back loop only (dc blo) for the texture.

To make the stem, start with a foundation chain of 8 stitches. Then, use slip stitches to shape the pointed top. The stem is made separately and sewn onto the pumpkin. This adds a cute finishing touch.

If you love crochet stitch guide or are new to beginner crochet stitches, this pattern is perfect. It’s a simple way to learn crochet stitches and create your own pumpkin.

By following the instructions and learning the crochet stitches, you’ll make a lovely pumpkin. It’s a great way to enjoy the autumn season. Let your creativity bloom!

Crochet Pumpkin Applique Instructions

Making the crochet pumpkin applique is a fun part of your cozy coffee cozy project. This pumpkin shape is made separately from the coffee cozy base. It lets you get creative and make your project unique. Let’s go through the steps to make this pumpkin come to life.

Stem and Leaf Attachment

To finish the pumpkin applique, we’ll add the stem and leaves. The stem is made of four rows of three single crochet stitches, giving it a fun curly look. For the leaves, we use single and double crochet stitches to shape them. After making the stem and leaves, we attach them to the pumpkin with the long tails and a tapestry needle.

To make the stem look great, mix 50% water with 50% white glue or Aleene’s Fabric Stiffener. This mix helps the stem keep its shape and adds a playful touch to your pumpkin applique.

If you like watching tutorials, check out the video on my Facebook page for the crochet pumpkin applique. You can also find the written PDF pattern through the link provided. I’m excited to see your creative takes on this design. Don’t forget to tag your work on social media with @naztazia and #naztazia!

The crochet pumpkin applique pattern is also on Ravelry, a favorite for knitting and crochet fans. For those who prefer hands-on learning, the video tutorial is on my YouTube channel.

The finished pumpkin applique will be about 10-11cm wide by 8-9cm tall (not counting the stalk) with DK yarn. You don’t need to worry about gauge for this pattern. You can use any yarn weight you like. Acrylic yarn is a good choice for its durability and affordability.

The pattern uses US crochet terms, but I’ve included UK crochet stitches too. Get ready to add autumn charm to your cozy projects with this delightful crochet pumpkin applique!

Adjusting the Mug Size for the Crochet Coffee Cozy

The crochet coffee cozy pattern I’m sharing fits a standard Starbucks reusable mug. But, you can easily change the size to fit any mug. Whether it’s a 12oz tumbler or a 16oz cup, the design ensures a perfect fit.

To change the size, just chain the right number of stitches for your mug, plus one more. This extra stitch makes the cozy fit snugly without being too tight. The pattern is versatile, making it great for crochet coffee cozy, adjustable coffee cozy, or customizable mug cozy projects.

The standard crochet coffee cozy pattern works for 12oz and 16oz cups. With a few tweaks, you can make it fit your favorite mug. This way, you get a stylish accessory that keeps your drinks warm and adds a handmade touch to your day.

Whether it’s for yourself or as a gift, this pattern is both versatile and practical. Get creative with yarn colors and textures to make your crochet coffee cozy unique. With some basic crochet skills, you’ll enjoy sipping in style and staying cozy all season.

Coffee Cozy Base Pattern: Step-by-Step Instructions

Making the perfect crochet coffee cozy pattern is simple with these easy steps. The single crochet coffee cozy starts as a flat rectangle. This rectangle will be folded and sewn to fit your mug. Here’s how to make this easy crochet coffee sleeve project.

  1. Start by chaining 35 stitches. This is the base of your cozy.
  2. Then, do 12 rows of single crochet, adding a chain 1 at the end of each row. This makes a rectangle about 3.5 inches tall and 4 inches wide when flat.
  3. The finished base has 34 stitches per row, since you’re crocheting a single crochet in each stitch.
  4. For a perfect fit, adjust the number of chains to match your mug’s size, plus one extra chain.

Now that the base is done, you can add the beautiful crochet pumpkin applique. Keep reading for the next steps in this cozy crochet adventure!

Crochet Technique Stitches Used Row Count
Single Crochet 34 stitches per row 12 rows

crochet coffee cozy pattern

“Embrace the coziness of the season with a homemade crochet coffee cozy that adds a touch of autumnal charm to your daily cup of joe.”

Attaching the Crochet Pumpkin Applique

Now that you’ve crocheted your colorful pumpkin applique, it’s time to attach it. Use the long tails on the pumpkin to secure it to the cozy with a tapestry needle. This method makes your cozy look professional and seamless.

To attach the crochet pumpkin applique, follow these simple steps:

  1. Lay the pumpkin applique on the cozy base, positioning it where you’d like it to be placed.
  2. Thread a tapestry needle with one of the long tails from the pumpkin.
  3. Weave the needle in and out along the edge of the applique, securing it to the cozy.
  4. Repeat this process with the remaining tails, working your way around the applique.
  5. Once all the tails are woven in, tie them off on the backside of the cozy and trim any excess yarn.

By attaching the crochet pumpkin applique with this straightforward technique, you’ll create a cozy that showcases your handmade touch. It captures the essence of the pumpkin spice season. Enjoy the process of bringing your crochet project to life!

“Crocheting an entire pumpkin can take 15-25 minutes for an experienced crocheter.”

Crochet Pumpkin Free Pattern: Cozy Assembly and Finishing

Assembling your crochet pumpkin cozy is the final step. It brings this delightful autumn creation to life. The key is to focus on creating an invisible seam for a polished, professional finish. Here’s how to assemble and complete your crochet pumpkin cozy:

  1. Fold the cozy piece with the wrong side facing out, ensuring the pumpkin applique is on the inside.
  2. Line up the rough edges of the cozy along the sides.
  3. Using a tapestry needle and the long tail yarn, stitch the edges together with a whip stitch or simple back-and-forth stitch, creating an invisible seam.
  4. Tie off the ends securely, then turn the cozy right-side out.

And just like that, your crochet pumpkin cozy assembly is complete! The final touches to your finishing crochet projects involve fluffing the pumpkin applique and adjusting the cozy to fit your favorite mug or tumbler.

“The key to a professional-looking crochet pumpkin cozy is in the invisible seam crochet technique. With a little care and attention to detail, you’ll have a cozy creation you’ll be proud to display.”

Congratulations on completing your cozy crochet pumpkin project! You can now enjoy the warm, autumn-inspired hug of your handmade creation every time you sip your favorite seasonal beverage.

crochet pumpkin cozy assembly

Crochet Pumpkin Free Pattern

Get ready to make a cozy crochet pumpkin pattern for your home. It’s perfect for all crocheters, from beginners to experts. You can make it small or big, and it’s easy to follow.

The pattern shows you how to crochet the pumpkin, stem, and leaf. It also guides you on how to put it all together. You can download a printable, ad-free PDF version for easy reference.

To start, you’ll need a few things:

  • Yarn in your favorite color(s)
  • A crochet hook of the right size
  • Polyester fiberfill for stuffing
  • Scissors
  • A tapestry needle
  • A glue gun (optional)

With your supplies ready, follow the simple steps to make your crochet pumpkin pattern. Try different yarn colors and sizes to make it special. Share your work on social media with #CrochetPumpkinCreations and inspire others.

“The joy of crocheting a pumpkin is in the process, not just the final result. Embrace the journey and let your creativity shine!”

Customizing Your Crochet Pumpkin

This free pattern comes in various sizes. You can also change it up with different yarn colors and textures. Try variegated yarns, velvet, or metallic for a unique look.

Whether you make one pumpkin or a whole patch, this printable crochet pattern is essential for fall crafting. Get cozy with your hook and yarn and let the fall magic begin!

Conclusion: Enjoy Your Cozy Crochet Creation!

I hope you enjoyed making this cozy crochet pumpkin as much as I did! These adorable cozies are perfect for fall decor and gifts. Share your finished projects on social media – I’m excited to see them. Happy stitching, everyone!

Adjust the hook and yarn to make your pumpkin any size you like. This free pattern is great for adding to your fall collection. Enjoy the cozy vibes of your new crochet piece!

Make sure to follow the stitch guide and assembly steps for a perfect pumpkin. With some time and effort, you’ll have a beautiful piece or a thoughtful gift. Happy fall, crafters!

FAQ

Where can I find the free pattern for the Crochet Pumpkin Spice Cozy?

You can find the free pattern for the Crochet Pumpkin Spice Cozy on my blog. It includes step-by-step instructions and a video tutorial.

What type of yarn is used for this crochet project?

This project uses medium (4) worsted weight yarn. I’m using I Love This Yarn in Ivory, Burnt Pumpkin, and Light Sage. I also used Red Heart Super Saver in Café Latte. You can swap it with similar brands and colors.

What crochet supplies are needed to make the Pumpkin Spice Cozy?

You’ll need a size G (6) crochet hook, a tapestry needle, scissors, and stitch markers. These tools are essential for completing the project.

What crochet stitches are used in this pattern?

The pattern uses basic stitches like the chain, magic circle, slip stitch, single crochet (SC), and double crochet (DC). These stitches are used to create the crochet pumpkin applique.

Can I adjust the size of the coffee cozy to fit my mug?

Yes, you can adjust the size by changing the chain stitch amount on the base. Chain the amount that fits your mug plus 1 stitch.

How do I assemble the Crochet Pumpkin Spice Cozy?

To assemble, fold the piece with the wrong side out (pumpkin inside) and align the edges. Use a tapestry needle and the long tail to stitch the edges together. Then, tie off the ends, turn it right-side out, and your cozy is ready!

Where can I find a printable, ad-free PDF version of the Crochet Pumpkin Free Pattern?

You can download a printable, ad-free PDF version of the Crochet Pumpkin Free Pattern on my blog.

Source Links