Crochet Bucket Hat

Craft Your Style with a Crochet Bucket Hat

Ever wondered how a simple hat can change your whole look? It adds both personality and practicality. Making your own crochet bucket hat is an adventure. It sharpens your creative skills and makes your style perfect.

Have you ever noticed how a simple hat can transform your entire look? A well-chosen accessory doesn’t just elevate your outfit; it adds a unique touch of personality and practicality. Enter the crocheted bucket hat—a versatile piece that seamlessly blends fashion with function. Not only does a crochet hat for women offer sun protection, but it also serves as a canvas for your creativity. 

Crafting your own fashion crochet hat is an exciting journey that not only sharpens your skills but also allows you to express your personal style in a fun and engaging way. Whether you’re aiming for a chic summer vibe or a cozy fall look, a handmade crochet bucket hat is the perfect addition to your wardrobe. Let’s explore how you can craft a unique and stylish hat that showcases your individuality.

Key Takeaways

  • Crochet bucket hats offer a blend of style and functionality.
  • Ideal for advanced beginners with techniques like working in a spiral and creating a flat top and brim.
  • Cotton yarn, especially Bernat Handicrafter, helps in retaining shape and provides a cooler option.
  • The hat fits an average adult woman’s head, with a crown measuring 6.5″ fitting a 22″ head circumference.
  • Personalization options include adding appliques or a custom band, making each hat unique to the crafter.

Introduction to Crochet Bucket Hats

Crochet bucket hats are back in style. They were popular in the ’60s and now add a cool retro vibe to your look. They also keep your head safe from the sun.

These hats are made with a special crochet pattern. It uses two yarns together for a strong yet soft brim. They come in sizes for everyone, from babies to adults.

Starting with a crochet bucket hat is a great way to learn. You’ll practice different stitches and techniques. It’s a fun way to improve your crochet skills.

The pattern is detailed and helps you get the right size. It includes tips for making sure your hat fits just right. Plus, subscribers get extra help and pattern updates.

With the right tools and yarn, you can make a stylish hat. It’s a fun project that’s both useful and fashionable. Start making your own crochet bucket hat today.

Benefits of Wearing a Crochet Bucket Hat

Wearing a crochet hat for women adds more than style to your look. They offer sun protection, are versatile, and breathable. A crochet sun hat keeps you cool and comfy in the sun.

A crochet bucket hat mixes old-school crafting with today’s fashion. Hats like the Hat Attack Crochet Bucket Hat – Natural ($165.00) are hand-crocheted with care. They’re made of 100% Raffia, have an adjustable sweatband, and are easy to clean.

Fashion stars like Bella Hadid and Ella Emhoff love crochet sun hats. Brands like Supreme and Prada feature them too. Designers like AMIRI and Nicholas Daley bring new ideas to the table.

Spring and summer bring pastel and bold patterns to crochet hats. They fit all ages and face shapes. Embellishments like flowers and beads make your hat unique.

Choosing the Right Yarn for Your Crochet Hat

When making a custom crochet hat, picking the right yarn is key. It affects both comfort and style. With so many yarns out there, it can be hard to choose. But, by considering a few things, you can make it easier.

Types of Yarn

Think about what your hat will be used for to pick the best yarn. Here are some types and their uses:

  • Cotton Yarn: Great for summer hats. It’s breathable and comfy. Brands like Bernat Handicrafter are durable and cool.
  • Aran Weight Cotton: Perfect for summer beach hats. It keeps a medium heat and wicks away moisture.
  • Linen Yarn: Good for bucket hats. It has a crisp texture and is light.
  • Alpaca Wool: Best for winter hats. It’s warm and soft.
  • Bamboo Yarn: Chosen for chemo hats. It’s soft and good for sensitive skin.
  • Faux Fur Yarn: Ideal for stylish, cold-weather bucket hats. It adds extra warmth.

Advantages of Cotton Yarn

Using cotton yarn, like Lion Brand’s “24/7 Cotton,” has many benefits for your hat:

  1. Durability: Cotton yarn keeps its shape well and lasts long.
  2. Comfort: Mercerized cotton is smooth and soft, making it comfy.
  3. Versatility: There are many colors to choose from, making it easy to personalize.
  4. Ease of Use: Medium weight cotton is easy to work with. It drapes well for floppy brims.
Yarn Type Recommended For Characteristics
Aran Weight Cotton Summer Beach Hats Breathable, Cool, Medium Heat Retention
Linen Yarn Bucket Hats Crisp Texture, Lightweight
Alpaca Wool Winter Warm Hats Warm, Soft
Bamboo Yarn Cancer Chemo Hats Soft, Hypoallergenic
Faux Fur Yarn Cold-Weather Bucket Hats Stylish, Warm

Choosing the right yarn for your custom crochet hat makes it beautiful, functional, and comfy for any season.

Essential Tools for Your Crochet Project

Starting a crochet project means you need the right tools. For a stunning crochet summer hat or a handmade crochet hat, having the basics is key. Here’s what you’ll need:

  • 4.5mm Crochet Hook: A hook that fits right is vital for even stitches in your crochet summer hat.
  • Stitch Marker: It keeps track of rounds and helps with accuracy, especially in complex patterns.
  • Scissors: Sharp scissors are needed to cut yarn cleanly, preventing frayed ends.
  • Tapestry Needle: It’s great for weaving in ends and adding the final touches to your hat.

These tools help keep your crochet summer hat looking great and make crafting fun. They’re essential for achieving a professional look. With the right tools, every stitch brings you closer to your dream handmade crochet hat.

Handmade crochet hat

Understanding Hat Sizing

Getting the right hat size is key for comfort and style. Whether it’s for winter or as a fashion statement, the fit matters a lot. A well-fitting hat can make a big difference, combining comfort with style perfectly.

Measuring Head Circumference

Start by measuring your head’s widest part. This is usually 2-3 inches above your eyebrows. Use this measurement to find the right hat size.

Here are standard head sizes for different ages:

  • Preemie: 9-12 inches
  • 0-3 months (newborn): 13-15 inches
  • 3-6 months: 15-16 inches
  • 6-12 months: 16-17 inches
  • Toddler: 17-18 inches
  • Child: 18-20 inches
  • Teen: 20-22 inches
  • Women’s: 21-23 inches
  • Men’s: 22-24 inches

With these sizes, you can make a hat that fits perfectly. Whether it’s for a baby or an adult, you’ll get the right fit. Remember to subtract about 2.55 inches from your head size for a snug but comfortable fit.

Also, check this chart to see how hat lengths vary by size:

Age Group Total Hat Length
Preemie 4 inches
0-3 months (newborn) 5 inches
3-6 months 5.5 inches
6-12 months 6.5 inches
Toddler 7 inches
Child 7.5 inches
Teen 8 inches
Women’s 8.5 inches
Men’s 9 inches

In summary, accurate measurements are crucial for a perfect fit. By practicing these, your crochet hat will be both stylish and cozy.

Basic Techniques for Crochet Beginners

Starting your crochet journey to make a beautiful summer hat or bucket hat is exciting. First, you need to learn basic techniques. These skills are the foundation for more complex projects and help you create items you’ll love.

Crochet Bucket Hat

Learning the magic circle is a great first step. It creates a tight center when crocheting in a circle, perfect for hats. You can find step-by-step tutorials online to help you learn.

After mastering the magic circle, it’s time to learn basic stitches. The single crochet (SC) and half-double crochet (HDC) are essential. These stitches are the base for many patterns, including bucket hats.

Knowing how to crochet in the round is also key. This method involves crocheting without stopping or joining rounds with a slip stitch. It’s used a lot in hat patterns to ensure a smooth finish.

Finally, learning to increase stitches is important for shaping hats. To make a flat circle for your hat’s top, you’ll need to add stitches evenly around the circle.

Technique Description
Magic Circle Circular foundation for tightly closed center
Single Crochet (SC) Basic stitch forming dense fabric
Half-Double Crochet (HDC) Raised stitch providing more height than SC
Working in the Round Continuous or joined rounds for circular projects
Increasing Stitches Adding stitches to shape a circle or expand project size

Mastering these techniques will prepare you for your first crochet hat project. These skills are not just for now but will help you grow as a crocheter.

Step-by-Step Guide to Making a Crochet Bucket Hat

Making a custom crochet hat is a fun and relaxing activity. It combines the joy of creating something unique with the calm of crochet. In this guide, we’ll go through the steps to make a handmade crochet hat. We’ll start with the crown, then move to the sides, and finish with the brim. Let’s get started!

Starting with the Crown

To start, you’ll use a magic circle or chain stitches to form a circle. Use a 4mm (US G/6) hook for this. You’ll crochet single crochets in a spiral, increasing to get a flat top. The crown should be about 17 cm (6 3/4 inch) after 12 rounds.

The yarn needed is two balls (130g/234yds) of Stylecraft Savannah, shade Canyon 3794.

For more detailed crochet patterns, check out this step-by-step guide.

Working Down the Sides

Next, you’ll work on the sides of your hat. Use single crochet in the back loop only for several rounds. This will give you the height you need. The sides should be about 69 cm (2.5 inch) in circumference.

Adding a few extra stitches occasionally helps align the sides. You can also use other yarns like Cascade Yarns Nifty Cotton or Knit Picks Dishie Cone for more variety.

Creating the Brim

The last step is making the brim, which is about 8 cm (3 1/4 inch) deep. You’ll change your crochet stitch direction to make it project outward. Increase stitches in some rounds to make a wide brim.

The hat will be about 24 cm tall and 27 cm wide when finished. You can buy a 10-page PDF version of the pattern for more detailed instructions.

By following these steps, you can make a beautiful handmade crochet hat. It’s perfect for special occasions or everyday wear. The joy of making your own hat is truly rewarding.

Customizing Your Crochet Bucket Hat

Adding a personal touch to your crochet bucket hat can make it a standout piece. Try adding appliques for a unique look. These can be crocheted flowers or embroidered patterns, offering endless creativity.

Playing with colors can also make your hat pop. Use yarns like Red Heart Super Saver Stripes for vibrant designs. Mixing different shades can make your hat truly one-of-a-kind.

Stitch variations can also customize your hat. Try using different stitches like popcorn or bobble. These not only add texture but also make the hat more sturdy.

Accessories like unique bands or ribbons can also enhance your hat. Whether it’s a simple band or something more elaborate, these details can make your hat special.

Don’t forget the little things. Finishing touches like a subtle edging or delicate trim can polish your hat’s look. By choosing and combining these methods, you can create a hat that shows off your style.

Care Instructions for Your Handmade Crochet Hat

Keeping your Crochet Bucket Hat in top shape is important. Here’s a guide to help you care for your custom crochet hat:

First, check the yarn band for fiber content info. This tells you how to care for it. For example, wool hats need hand washing to keep their shape and quality. Use cold water, about 20ºC, for washing wool.

Choose mild, wool-friendly detergents for washing. Don’t use fabric softeners as they can harm your Custom crochet hat. For stains, use a gentle soap and a damp cloth for spot cleaning.

Care Step Recommendation
Washing Hand wash in cold water with a mild detergent. Use a delicate cycle if opting for machine washing.
Drying Lay flat to dry for 12-24 hours to avoid misshaping. Avoid dryers and direct sunlight.
Storage Store flat or folded to maintain shape. Use a hat stand or sturdy box for travel.
Reshaping Use an iron with a damp cloth to gently reshape the brim as needed.

Drying your hat right is key to keeping its shape. Lay it flat on a drying rack or a clean towel for at least 12 hours. Stay away from direct sunlight and dryers to prevent fading or misshaping. Store your hat flat or folded to keep its shape.

If your hat needs reshaping, place it on an ironing board. Cover it with a damp cloth and iron on a low setting. Regular care, like gentle handling and proper storage, will keep your Custom crochet hat looking great for years.

Inspiration and Ideas: Fashioning Your Crochet Bucket Hat

Looking for inspiration for your crochet summer hat is fun. You can pick from many colors and accessories. Your hat can show off your style, whether you like old trends or new styles.

Color Combinations

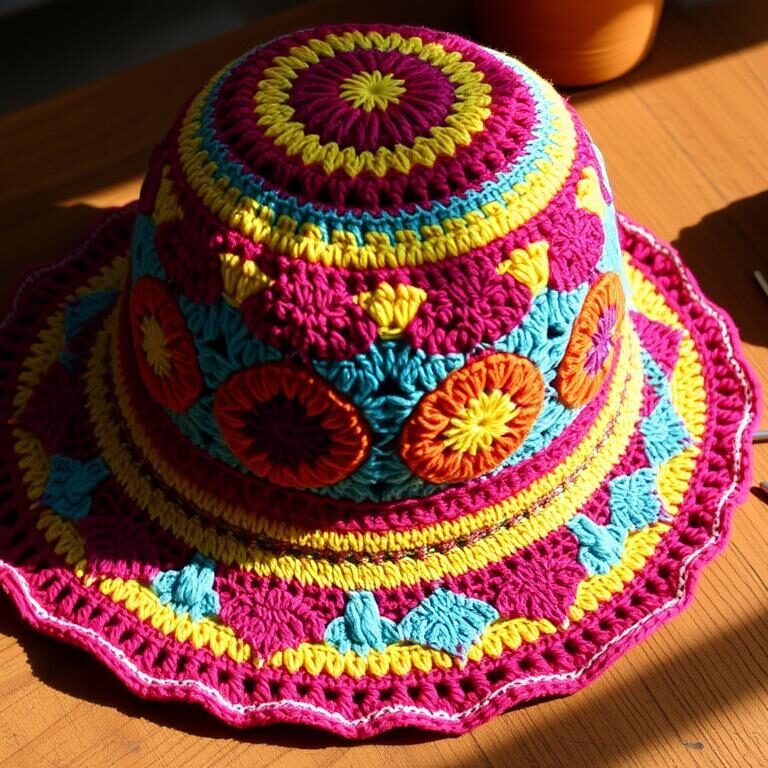
Try mixing colors to make your crocheted bucket hat pop. Use shades from brands like Red Heart Super Saver Stripes and Bernat Stripes. You can start with soft pastels, earthy tones, or bold contrasts.

Color Palette Description Brands
Pastel Mix Soft, muted colors perfect for a delicate look. Red Heart, Bernat
Earthy Tones Rich, natural hues ideal for a rustic style. Lion Brand, Patons
Vivid Contrasts Bold and bright colors for a striking appearance. Caron, Premier Yarns

Accessorizing Your Hat

Adding accessories can really make your crochet summer hat stand out. Here are some ideas:

  • Bands: Add colorful bands or ribbons for a neat look.
  • Brim Borders: Crochet a different border around the brim for more style.
  • Appliques: Put on fun shapes like flowers, stars, or initials to make it yours.

Use patterns like the wide brim “Raffie” Sun Hat or the stylish LUCCA Fedora Hat. You’ll find many ways to make your hat unique.

Conclusion

The crochet bucket hat is a mix of function, style, and personal touch. It’s easy to make and adds a cool touch to your outfit. Plus, it keeps the sun off your face.

It’s fun to make, no matter if you’re new or have been crocheting for years. You can pick from many designs, like psychedelic or granny square. This shows how crochet lets everyone express their style.

What makes a custom crochet hat special is making it your own. You can use different colors or add designs. This makes your hat truly unique and trendy.

Making a crochet bucket hat is more than just crafting. It connects you to a community of crafters. It’s about enjoying the process and creating something special. With lots of resources out there, you can make your own stylish hat.

FAQ

What materials are needed to make a crochet bucket hat?

You’ll need cotton yarn, like Bernat Handicrafter. Also, a 4.5mm crochet hook, stitch markers, scissors, and a tapestry needle for finishing.

How do I choose the right yarn for my crochet bucket hat?

Choose cotton yarn for its shape retention and cool feel. Bernat Handicrafter is great for summer because it’s heat-resistant.

What basic techniques should I know before starting a crochet bucket hat?

Learn to make a magic circle and basic stitches. You’ll also need to work in the round and increase stitches for a circle shape.

How can I ensure my crochet bucket hat fits properly?

Measure your head about 2-3 inches above your eyebrows. Use this to adjust your pattern, aiming for a 6.5” crown for a 22” head.

Can I customize my crochet bucket hat?

Yes! Add personal touches with appliques or color changes. Try different stitch patterns for a unique look.

What are the benefits of wearing a crochet bucket hat?

It protects from the sun, adds style, and is versatile. It’s breathable, making it perfect for any occasion and age.

How do I care for my handmade crochet hat?

Wash it gently by hand with mild detergent. Reshape while wet and lay flat to dry. For stains, use gentle soap and a damp cloth. Steam to reshape if needed.

What inspires the design of a crochet bucket hat?

Inspiration comes from vintage trends, colors, and nature. Use yarns like Red Heart Super Saver Stripes and add accessories for a unique design.

Source Links